Disassembly
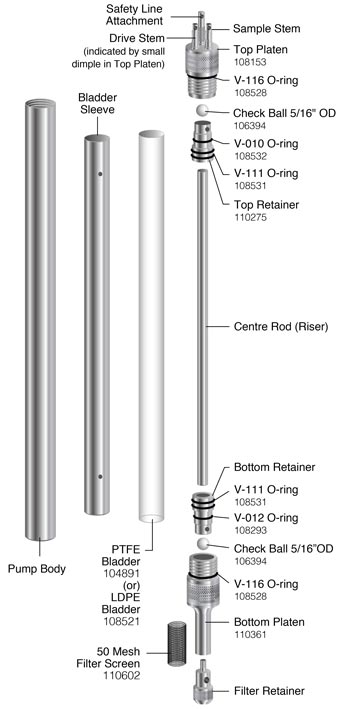
- Remove the Filter Retainer, Filter Screen and Top and Bottom Platens, being careful not to lose the Check Balls. Remove the Bladder Sleeve from the Pump Body.
- Remove the Top and Bottom Retainers from the Bladder Sleeve. While gripping the Bladder Sleeve, you may need to push one end onto a solid surface to help get the first Retainer out, then use the Center Rod to push the other Retainer out. Slide the Center Rod out of the Bladder.
- Remove the Bladder from the Bladder Sleeve using a pair of needle nose pliers.
Note:
The pump has been washed before leaving Solinst, however, you may wish to decontaminate your pump before use. The pumping assembly should be decontaminated between wells.
Decontamination
Note:
- Always follow your local guidelines and standard protocols.
- Do not use acetone on the O-rings.
- Completely disassemble the Pump.
- Wash all pump components with phosphate-free soap or a detergent.
- Rinse all components thoroughly with deionized water.
- Replace any worn O-rings and Bladder if necessary, and reassemble.
- The Pump's interior can be cleaned without disassembling by flushing your cleaning solution up and through the Pump's intake. With the Pump's Filter removed, use a peristaltic pump connected to the Bottom Platen, to push the cleaning solution through the Pump. Then flush the Pump with deionized water.
Reassembly
- Manually slide the Bladder into the Bladder Sleeve. It will extend beyond the Bladder Sleeve at both ends.
- Using your finger, flare both ends of the Bladder.
- If necessary install new O-rings on both Top and Bottom Retainers and both Platens (8 in total).
- Slide the Bladder so about 1/4" extends beyond one end of the Bladder Sleeve. Hold the other end of the replacement Bladder to minimize slip within the Sleeve. Liberally lubricate a Retainer with water, and insert it first at a 45° angle and rotate gently back and forth until the Bladder has been pushed about 1/4" past the second O-ring on the Retainer.
- Insert the Centre Rod into the Sleeve and ensure it seats in the Retainer.
- Trim the Bladder at the other end so it extends at least 1/4" beyond the Bladder Sleeve. Lubricate the second Retainer with water, insert it at a 45º angle then align it onto the Centre Rod. Working gently to avoid twisting or crumpling of the Bladder, push the Retainer into the Bladder until the Center Rod is fully seated in both Retainers and the Bladder has been pushed about 1/4" past the second O-ring on the Retainer.
- Using a sharp knife, trim any excess Bladder material so it is flush with the edges of the Bladder Sleeve on both ends.
- Take the Bottom Platen and drop the 5/16" OD Teflon Check Ball into it.
- Fit the end of the bladder assembly firmly into the Bottom Platen.
- Slip the Pump Body over the assembly and screw it onto the Bottom Platen.
- Drop a Check Ball into the Top Platen and screw the Pump Body onto it.
- Shake the assembled pump to hear if the Check Balls rattle. If not, repeat steps 8 to 11, to ensure that the Check Balls are positioned correctly.
- Fit the Filter Screen onto the Bottom Platen and screw the Filter Retainer into place.


