Tools and Materials Needed
- 101B P1 Replacement Probe Assembly/Weight (#112162)
- 2 x Steel Probe Sleeves
- 3 x Roll Pins (1/8"x 1/2" 18-8)
- 2 x Ferrules
- Hammer
- Roll Pin Extraction Tool (if required) (solid pin just under 1/8" diameter)
- Scissors or Shears
- Wire Strippers
- Ferrule Crimp Tool (see photo)
- Awl

101B P1 Replacement Probe Assembly / Weight
Note:
If you are using the replacement probe as an additional weight, you do not need to use the ferrules that come with the assembly
Removing a Probe from the 101B
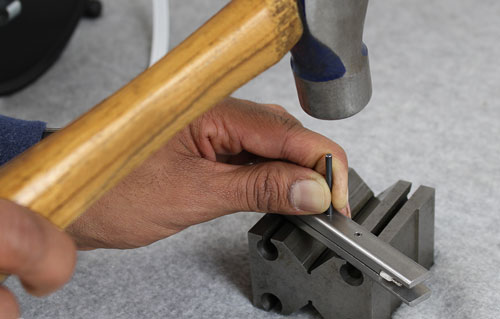
If required, to remove a probe, use a hammer and an extraction tool (solid pin just under 1/8" in diameter) to tap the three roll pins through the tape and out of the probe sleeves.

Hammer and Extraction Tool
Preparing 101B Tape for Probe Attachment
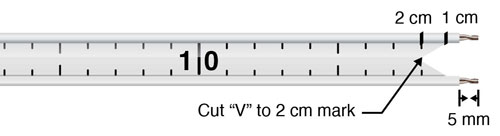
- Cut the tape straight across at a cm marking (your new "zero point"). Use a black marker to place a small mark on the edge of the tape at the 1 cm (0.4") and 2 cm (0.8") marks.
- Cut the tape along the wire leads to the 1 cm (0.4") mark, then cut the webbing in a "V" shape back to the 2 cm (0.8") mark.
- Strip the wire leads by 5 mm (0.2").
- Place a ferrule on each stripped lead and push each ferrule all the way to the tape jacket.
- Use a ferrule crimp tool to connect the ferrules to the stripped leads. See photo of tool options.
- Cut the ferrules to 5 mm (0.20") in length.
Note:
You may need to twist the wires so they slide easier into the ferrules.
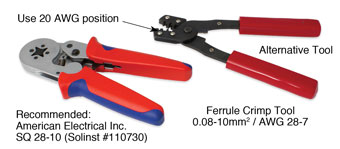
Ferrule Crimp Tool Options

Installing the 101B Probe/Weight to Flat Tape
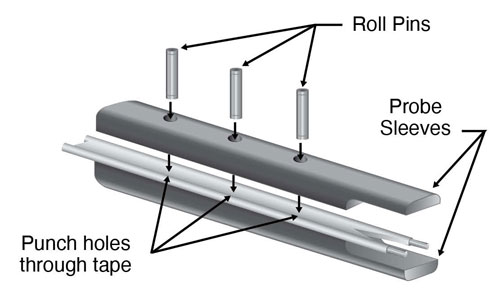
- To install the new probe/weight on the tape, line up the two probe sleeves as shown in the photo below, so that the tape sits in the recess of the probe sleeves. When replacing the probe on a 101B, ensure the end of the "V"sits at the point where the probe sleeves come together.
- With the probe sleeves aligned, use an awl to pierce the tape through one of the holes in the probe sleeves. Use the hammer to tap a roll pin through the opening in the probe sleeves and tape.
- With the first pin installed flush with the edges of the probe sleeves, use the awl to pierce the other two holes. Use the hammer to install the two remaining roll pins. Ensure all the pins are flush with the outside edges of the probe sleeves.
- To test a probe, dip it in a glass of tap water. The buzzer and light on the Meter should be activated.
Note:
There should be 2 mm (0.08") from the ferrule tips to the end of the probe sleeves.
Note:
You can use vice grips to hold the probe sleeves together while using the awl and hammer, as this will take some force.
Note:
When the two probe sleeves are installed, they are 1/2" (12.7 mm) wide, have an effective diameter of 5/8" (16.5 mm) and weigh 100 grams (3.5 oz).
