Tools and Materials Needed
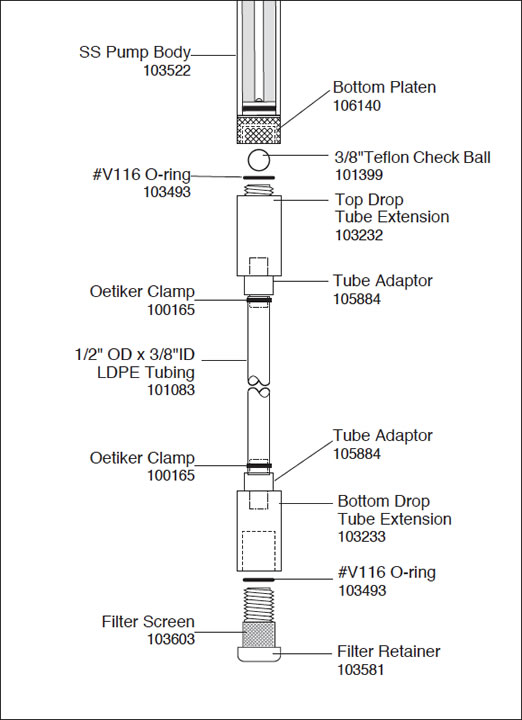
- 407 1.66" SS Drop Tube Assembly (#103231) Includes:
- Top Drop Tube Extension (#103232)
- Bottom Drop Tube Extension (#103233)
- 2 x 3/8" NPTM x 3/8" Tube Adaptors (#105884)
- 2 x 3/8" OD Teflon® Check Balls (spare) (#101399)
- 4 x single ear 14.0 Oetiker clamps (2 spare) (#100165)
- 2 x #V116 O-rings (one as spare) (#103493)
- 1/2" OD x 3/8" ID LDPE tubing (#101083) (length as required)
- Tubing Cutters
- Oetiker Pliers (#100144)
Operating Principles
A Drop Tube Assembly allows samples to be obtained from greater depths then the standard maximum 500 ft. (150 m) below grade for stainless steel Bladder Pumps. The Drop Tube places the screened filter intake of the Pump as deep as necessary to access the sample zone desired.
The Drop Tube Assembly is easily installed on existing Pumps, even in the field. Pumps are operated in the same manner as those without a Drop Tube, which maintains high sample integrity.
Installation
- Select and cut the appropriate length of 1/2" OD x 3/8" ID tubing. The most common type of tubing used is low density polyethylene (LDPE).
- Being careful to retain the check balls, unscrew and remove the Filter Retainer (with the filter screen) from the Bottom Platen of the Pump. Keep this for attachment later.
- Insert the Check Ball into the stem of the Top Drop Tube Extension.
- Ensure there is a #V116 O-ring over the stem of the Top Drop Tube Extension, and tighten by hand into the Bottom Platen of the pump.
- Place one Oetiker clamp over the Tube Adaptor on the bottom of the Top Drop Tube Extension.
- Push one end of the 1/2" OD x 3/8" ID tubing over the Tube Adaptor on the bottom of the Top Drop Tube Extension.
- Use the Oetiker pliers to crimp the clamp and secure the tubing to the Tube Adaptor.
- Take the Bottom Drop Tube Extension and place an Oetiker clamp over its Tube Adaptor.
- Use the Oetiker pliers to crimp the clamp and secure the other end of the tubing to this Tube Adaptor.
- Thread the Filter Retainer (with the filter screen) into the bottom of the Bottom Drop Tube Extension, ensuring the O-ring on the Filter Retainer properly seats.
- The Bladder Pump is operated in the same manner as those without a Drop Tube. See separate operating and pumping instructions. The entire Pump Body must be submerged when operating with a Drop Tube Assembly.
Note:
Other sizes and types of tubing may also be used, however, the end user will need to supply their own tubing and tubing adaptors.
Notes:
- See separate operating instructions for the 1.66" OD SS Model 407 Bladder Pumps. The Pump Body must remain submerged during operation.
- Refer to the Model 464 Pump Controller operating instructions, for detailed pumping instructions.
- This Drop Tube Assembly is also suitable for use with the 1.66" OD Model 408 SS Double Valve Pumps. (See separate operating instructions.)
Model 407 SS 1.66" Diameter Drop Tube Assembly