Point Source Bailer Instructions - 1.5", 1", and 0.5" Diameter
Sampling
- Attach enough support cable to the top of the bailer to allow lowering to the maximum depth required. (Use stainless steel cable or Teflon® coated stainless steel cable). Make sure that the cable connection is secure.
- Slowly lower bailer on the support cable to the desired sampling depth.
- Raise the bailer to the surface using an steady rate of retrieval.
Note:
When storing the point source bailer for a long period of time, lubricate all o-rings. However do not lubricate the Bottom Check Valve O-rings prior to use.
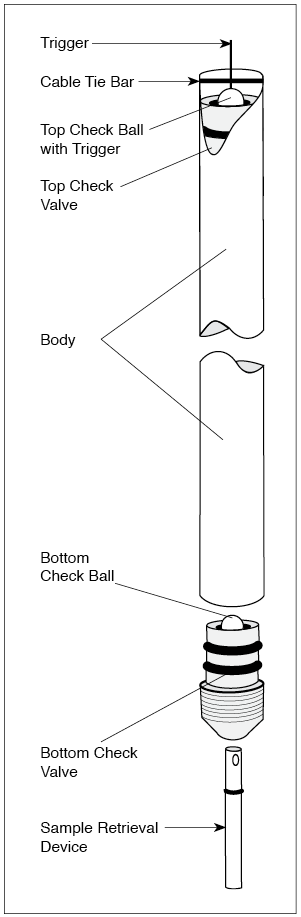
Sample Retrieval
- Hold the Point Source Bailer vertical and insert the Sample Retrieval Device into the bottom of the bailer, to displace the Lower Check Ball.
- Direct the outlet of the Sample Retrieval Device into the sample container.
- Push the trigger on Top Check Ball in any direction to allow the sample to drain from the bailer.
Note:
Adjusting the amount of movement on the Trigger allows sample flow from the bailer to be regulated.
Cleaning the Bailer
- Disassemble bailer, as described overleaf.
- Clean all components with a non-phosphate soap followd by a deionized water rinse.
- Re-assemble bailer, as described overleaf.
Note:
Further cleaning of all components except the o-rings can be achieved by using hexane or similar solvent followed by 2 or 3 rinses with deionized water. Strong cleaning solutions may damage the o-rings.
Bailer Disassembly
- Holding the bailer upside down, remove Bottom Check Valve by twisting and pulling. If very tight, use vise grips over a cloth to avoid damage.
- Remove the Bottom Check Ball by turning the bailer right side up, allowing the ball to roll out.
- Use a 2' long wooden dowel to push the top check valve out of the bailer from top out through the bottom of the bailer.
- Remove o-rings from Top and Bottom Check Valves.
Re-Assembly
- Replace any damaged o-rings on both Top and Bottom check valves.
- Push Top Check Ball with Trigger into the bailer with the trigger toward the top.
- Use wooden dowel to push the Top Check Valve into the bailer so that the trigger extends about 1/2" above the top of the bailer body.
- Insert the Bottom Check Ball into the bailer.
- Push the Bottom Check Valve firmly onto the bailer.
Note:
Do not lubricate the Bottom Check Valve O-rings prior to use.
Note:
Do not use bailer until Bottom Check Valve is properly locked in place.