
Instructions
Notes:
- The air tank is rated to 175 psi.
- If a car battery is used, be sure the vehicle is running as the compressor will drain the battery quickly. If a stand alone battery is used, the battery will drain in approximately 20 minutes.
- It is recommended not to alter the power cord for use with a cigarette lighter adapter.
- The compressor is thermally protected, therefore it will automatically shut off if it overheats. Once the compressor has cooled sufficiently, it will power up once again.
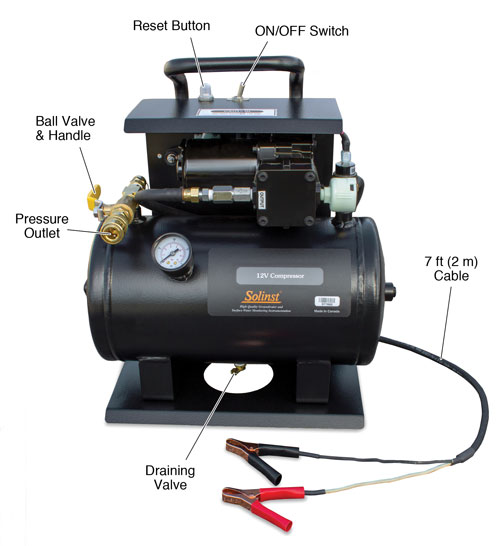
- A 25 amp circuit breaker reset button is located on the top of the Compressor. Push to reset.
- Connect the pressure line from the Solinst pump control unit to the pressure outlet on the 12 Volt Compressor.
- Ensure that the ON/OFF switch is in the OFF position before connecting to the power source. The ball valve handle on the side of the compressor should also be in the OFF position before connecting.
- Connect the compressor to a 12 volt DC power source (such as a car battery) using the alligator clips. The red clip should connect to the positive terminal on the power source, and the black should connect to a proper ground or to the negative terminal on the power source.
- Once the compressor has been connected to the power source and to all pressure lines, switch the compressor ON. This will begin to charge the tank to 150 psi, which takes approximately 4 minutes.
- Once the tank has been fully charged to 150 psi, switch the ball valve to the ON position.
- Once pumping begins, the air pressure in the tank will drop to 100 psi. The compressor will then recharge to 150 psi or to the selected pumping rate.
Maintenance
After every 20 hours of operation, the compressor tank should be vented first, then drained. If the compressor is being operated in more humid conditions, it may need to be drained more often.
Notes:
If not draining the tank, it is not necessary to vent the tank, before disconnecting the supply and drive lines. All of these air fittings are designed to safely connect and disconnect under pressure. If the tank is empty, or at a very low pressure, it will be easier to connect/disconnect the lines.
To vent/release the air pressure from the compressor, turn the compressor OFF and disconnect the clips from the power source. Ensure the ball valve handle is in the ON position. With the drive and sample lines still connected to the pump control unit, select “Drive” on the pump control unit until the compressor’s pressure gauge shows 0 psi.
Notes:
Do not open the draining valve until all air in the compressor tank has been released (gauge shows 0 psi).
To drain the compressor tank, turn the draining valve on the underside of the tank counterclockwise to open. This allows condensation/water to exit the tank.
| Technical Specifications | |
|---|---|
| Width: | 15" (38 cm) |
| Depth: | 10" (25 cm) |
| Height: | 16" (41 cm) |
| Weight: | 21 lbs (9.5 kg) |
| Tank size: | 2 US gallons (7.6 litres) |
| Pump time to fill tank from 0 - 150 psi: | 4 minutes |
| Pump Rates: | 1.12 cfm @ zero head to 0.4 cfm @ 125 psi |
| Power Draw: | 18 - 20 amps (25 amp reset fuse) |
| Max. Operating Pressure: | 150 psi |
| Auto on/off Feature Setting: | 100 psi - on 150 psi - off |
| Cord Length: | 7 ft (2 m) |
