A LevelSender 5 can be updated with changes in two ways:
- Directly, by connecting it to a PC with the USB cable and using the LevelSender Software.
- Remotely, by using the LevelSender Changes tab in the LevelSender Software (if enabled – see Section 4.2.3).
Note:
You can also send some remote commands using a plain text email to the LevelSender email address (see Section 8.6).
4.3.1 LevelSender Updates via USB
If you need to make changes to the SIM card settings, LevelSender Email, or data recipients, you will need to do this by connecting to the PC with the USB cable and using the LevelSender Setup Wizard.
Select the LevelSender station from the list in the LevelSender Software, click ![]() to start the Setup Wizard. See Section 4.2.
to start the Setup Wizard. See Section 4.2.
If you want to stop the LevelSender, use the Diagnostic Info tab (see Section 8.1).
You can use the LevelSender Changes tab to remotely update the sampling/reporting schedule for a LevelSender (see Section 4.3.2). You can also update or set up your connected dataloggers to record independently and send alerts for alarm conditions, and enable barometric compensation. You can update data recipients by sending a remote email command (see Section 8.6).
4.3.2 Remote LevelSender Updates
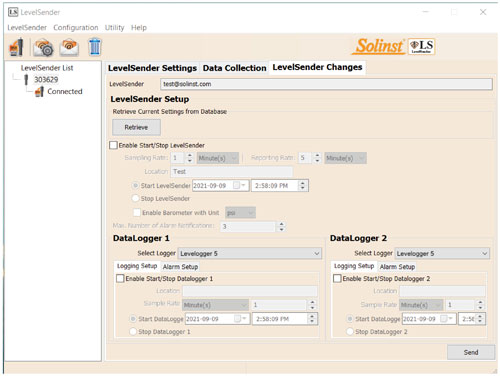
To make changes to a remote LevelSender 5 station, click the LevelSender from the list in the LevelSender Software, then click on the LevelSender Changes tab.
The unique email that you set to be associated with the LevelSender will appear in the LevelSender Email field. (see Section 4.2.3).

Figure 4-13 LevelSender Changes Tab
Click the Retrieve button to obtain the current LevelSender and datalogger settings. The datalogger settings are only available after the LevelSender Software has received at least one data email.
From here, you can edit the LevelSender Setup, including Sampling Rate, Reporting Rate, and Location.
You can set a new Start time for the LevelSender, or Stop a LevelSender from sampling/reporting.
Note:
If you Stop a LevelSender, it will stop sampling/reporting, but will continue to check for remote email updates (e.g. a new start time) from the Home Station at the set reporting rate. It will use a small amount of battery and data during these checks.
Note:
To stop your LevelSender from reporting and checking for updates, it must be done with the LevelSender directly connected to the LevelSender Software using the USB cable and the Diagnostics Info tab (See Section 8.1).
Note:
Any changes made in this tab will not be applied to the remote LevelSender until after its next report (they will not occur right away). You should know your LevelSender schedule so you can apply changes at an appropriate time.
There is also the option to enable, or disable the internal barometer (see Section 4.2.5).
You can update or set the connected dataloggers to record independently in their own internal memory. Check the box to enable updates to the datalogger. You can program the following for each connected datalogger:
You can also set the connected dataloggers to record independently in their own internal memory. You can program the following for each connected datalogger:
- Select Logger: select the type of datalogger connected, e.g. Levelogger 5, Barologger 5, etc.
- Location: specific site / location information that you input to identify each datalogger.
- Sampling Rate: the rate at which the datalogger records in its internal memory. Sampling rate depends on the type of datalogger connected.
- Start Datalogger: set a date and time for the datalogger to start recording, or select to Stop the datalogger from recording if it is already logging.
Note:
When using a Splitter, the number 1 or 2 will identify the Dataloggers in LevelSender Software. The numbers are labeled directly on the Splitter.
There is also the option to update or add alarm settings for the connected dataloggers (see Section 4.2.6).
Note:
See the Levelogger and Vented Dataloggers User Guides for more information on each datalogger type, and their logging capabilities.
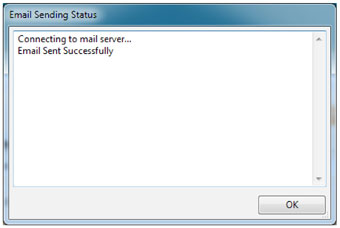
Once you have finished editing the LevelSender settings, click Send. You should get a message that the configuration email was successfully sent to the remote LevelSender station.
A copy of this remote LevelSender update configuration email can be viewed in the Sent Email tab in the Data Collection tab (see Section 5.3).
These changes will be applied to the remote LevelSender station at its next scheduled report interval (as set in Step 5 of the LevelSender Setup Wizard (see Section 4.2.5)).
Once the new settings have been applied, an email will be sent from the LevelSender to the Home Station.

Figure 4-14 Successful Configuration Email Send


