When you choose Basic compensation, the next step is to select the Barologger file you want to use for compensation, then select the Levelogger file(s) you want to compensate. You can only select one Barologger file to compensate multiple Levelogger files.
Note:
One Barologger can be used to compensate all Leveloggers in a 20 mile (30 km) radius and/or with every 1000 ft. (300 m) change in elevation.
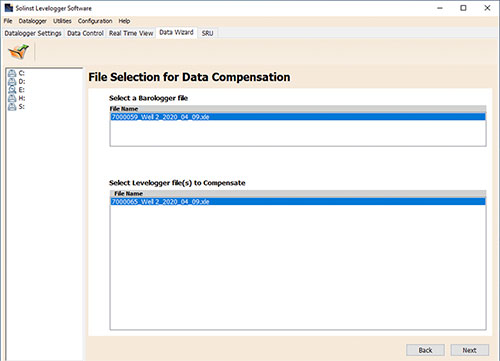
Figure 8-2 Selecting Files for Barometric Compensation
For best accuracy, the Levelogger file(s) and Barologger file should have the same start time and logging interval. (The Future Start option in the Datalogger Settings tab is a convenient way to start all of your loggers at the same time.) If there is an inconsistency of the time stamp between the Barometric file and the Levelogger file(s), a linear approximation on the barometric data will be performed.
Any files you have open in the Data Control tab will be listed.
Use the directory on the left of the window or click ![]() to open any other Levelogger data files you would like to compensate. Ensure the files you want to compensate are highlighted in the list. Both the Barologger file and Levelogger file(s) must be highlighted. Do this by clicking the file name. To de-select a file, click it again. Multiple Levelogger files can be selected at once.
to open any other Levelogger data files you would like to compensate. Ensure the files you want to compensate are highlighted in the list. Both the Barologger file and Levelogger file(s) must be highlighted. Do this by clicking the file name. To de-select a file, click it again. Multiple Levelogger files can be selected at once.
Note:
Both a Barologger file and a Levelogger file must be selected to complete a Barometric Compensation.
Select Next to complete the compensation.
The compensated data will automatically be saved in a new *.xle file. The default file name will be the <original Levelogger file name> with the word <compensated> added to the file name prefix. Alternatively, the user can rename the compensated file by saving it in the Data Control tab. Do not change or delete the file extension. All data files are saved to the default location: <C:\Program Files\Solinst\Levelogger4_7\Data>.
Note:
The default directory for saved files can be changed by clicking the Configuration menu at the top of the program window, selecting 'Application Settings' and inputting or navigating to a different folder destination.
The next window will show the results of the compensation. If the compensation was unsuccessful, there will be an explanation in the Reason column (e.g. time stamp of Levelogger and Barologger files were not close enough to perform an accurate compensation). You can still view the compensated file in the Data Control tab by clicking 'Open' in the Action column. If the compensation is successful, select 'Open' to view the compensated file in the Data Control tab.
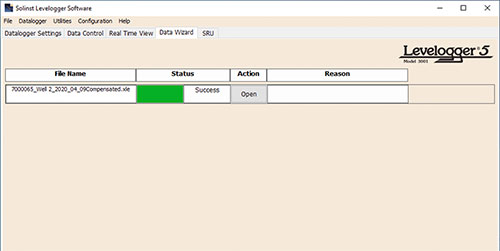
Figure 8-3 Barometric Compensation Results
If you have selected multiple files for compensation, there will also be the option to 'Open All' of the compensated files in the Data Control tab or 'Export All' of the compensated files at the same time. Options are to export as *.csv files or *.xml files.
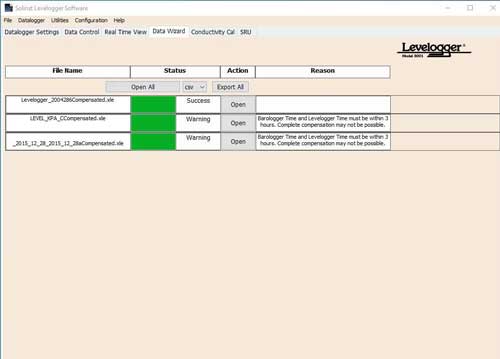
Figure 8-4 Barometric Compensation Results - Multiple Files
From the Data Control tab, you can view the data, save the compensated file with a new filename and/or export the data (see Section 7).
All the original Levelogger settings and the channel information effective during data collection are shown on the top left of the window. The bottom left sections of the window are used to display the compensation information. The middle section displays information from the Barologger.
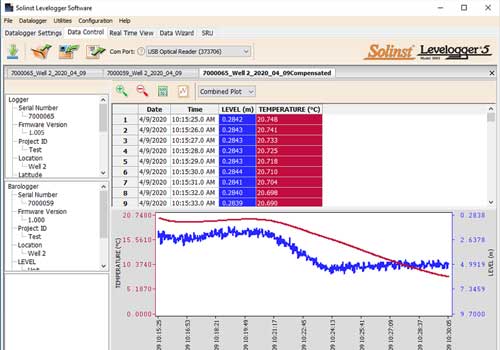
Figure 8-5 Viewing Compensated Files in the Data Control Tab


