Note:
Ensure the Levelogger is operating with the latest firmware, and that you are using the latest software. Visit the Solinst website (https://downloads.solinst.com/) or use the update notifications in the software for assistance. If older Levelogger versions are used, refer to our Compatibility Chart on the Downloads page.
- Connect the Levelogger to the communications device and start the software.
- Select the appropriate COM or USB port for the connected communications device from the centre drop-down menu.
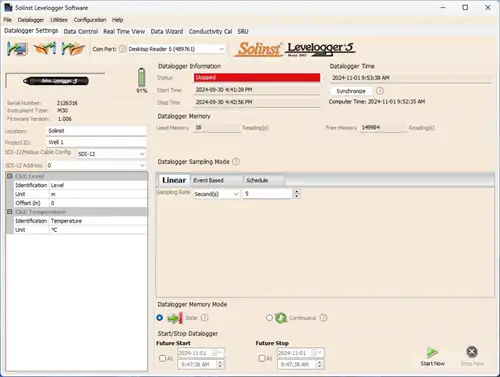
 Click the 'Retrieve Settings from Levelogger' icon. This will retrieve and display information about the connected datalogger, and any current programmed settings.
- You can now customize the Levelogger including your Project ID, Location, Sampling Mode and Rate, and Future Stop and Start times.
Note:
If you are using the datalogger with an SDI-12/MODBUS Cable, please see separate User Guides.
Tip:
![]() If a number of Leveloggers are to be programmed with identical inputs, clicking the 'Save Default Settings' icon will create a template.
If a number of Leveloggers are to be programmed with identical inputs, clicking the 'Save Default Settings' icon will create a template.

Datalogger Settings Window
Note:
Clicking on the ![]() in the software will provide you with a short explanation of that feature, e.g. Com Port, Slate Mode, Time Synchronization, etc.
in the software will provide you with a short explanation of that feature, e.g. Com Port, Slate Mode, Time Synchronization, etc.
Rainlogger 5 Programming
 The Rainfall Calibration Constant 'value' of the tipping bucket rain gauge used with the Rainlogger is required when programming the Rainlogger 5. Consult the Levelogger User Guide for more information on programming the Rainlogger 5.
Levelogger 5 LTC Calibration
 Before deploying your Levelogger 5 LTC, be sure to calibrate the instrument. To begin calibration, open the 'Conductivity Cal' tab and follow the steps provided. Consult the Levelogger User Guide for more information, or view the LTC Calibration Video on our YouTube Channel: https://www.youtube.com/user/SolinstCanadaLtd


