To start the LevelSender Software, click ![]() on your desktop, or click the Start button and select: Programs > Solinst > LevelSender.
on your desktop, or click the Start button and select: Programs > Solinst > LevelSender.
The LevelSender Software main window will be displayed. From here you can set up the Home Station email, view LevelSender settings, set up new LevelSender remote stations, edit existing LevelSender settings, and receive and open LevelSender emails and data.

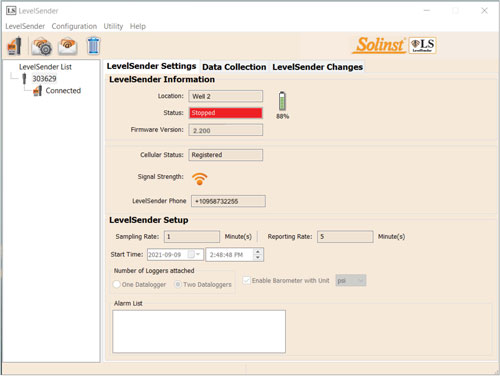
Figure 3-2 LevelSender Settings
If the software is running, connecting a new LevelSender station using the USB cable will automatically start the LevelSender Setup Wizard. See Section 4.2.
The window on the left of the Software lists each programmed LevelSender station ![]() by its serial number. If the LevelSender station is connected to the Home Station PC using a USB cable, it will be identified with "Connected" and an icon
by its serial number. If the LevelSender station is connected to the Home Station PC using a USB cable, it will be identified with "Connected" and an icon ![]() below it.
below it.
To delete a LevelSender station, click to highlight it in the list, then click the delete icon ![]() .
.
3.4.1 LevelSender Software Options
Selecting the serial number of a programmed remote (or connected) LevelSender station ![]() from the list will display the LevelSender Settings:
from the list will display the LevelSender Settings:
LevelSender Information
- Location: specific site / location information that you input to identify each LevelSender station.
- Status: the LevelSender will either be "Started" with a previously programmed data collection schedule, "Stopped", or "Waiting to Start" at a programmed future start time.
- LevelSender Time: the real-time, internal clock of the LevelSender.
- Firmware Version: the firmware version of the LevelSender station will be displayed.
- Cellular Status: the LevelSender will either be "Registered" and properly setup with the wireless carrier, or "Not Registered" – the LevelSender does not have the wireless carrier properly set up, or there is a communication problem with the carrier.
- Signal Strength: the signal strength of the LevelSender GSM radio module will be displayed.
- LevelSender Phone Number: the phone number associated with your GSM cellular account.
Note:
The status will update after the first report. Before that, the status will be "Waiting to Start".
LevelSender Setup
- Sampling Rate: the rate that the LevelSender station collects data from the connected datalogger(s).
- Reporting Rate: the rate that the LevelSender station reports collected data via email/SMS.
- Start Time: the date and time the LevelSender started collecting data (or date and time the LevelSender is programmed to start).
- Number of Dataloggers Attached: either one or two dataloggers will be attached.
- Enable Barometer with Unit: if checked, indicates that the internal barometer is used to compensate water level readings in the units shown.
- Alarm List: the alarm settings you have applied to each of the attached dataloggers.
The Data Collection and LevelSender Changes tabs will also be available. See Sections 5.3 and 4.3 for the functions of these tabs.
3.4.2 Connected LevelSender Software Options
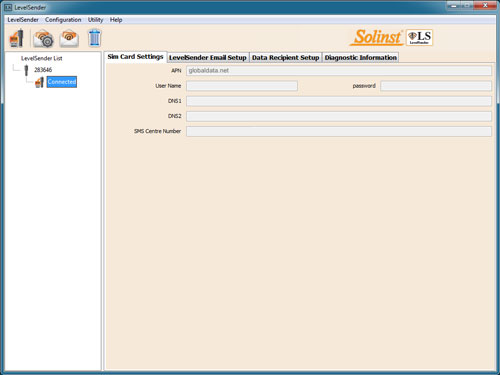
Selecting "Connected" below a programmed LevelSender ![]() from the list will display the Sim Card Settings, LevelSender Email Setup, Data Recipient Setup, and Diagnostic Information tabs.
from the list will display the Sim Card Settings, LevelSender Email Setup, Data Recipient Setup, and Diagnostic Information tabs.
The function of the first three tabs is to review the settings that have previously been applied to the connected LevelSender station. See Section 8.1 for an overview of the Diagnostics Information tab.

Figure 3-3 Connected LevelSender Tabs


